
- Acrylic Signs
- Balloons
- Booklets
- Bookmarks
- Boxes and Packaging
- Brochures
- Business Cards
- Calendars
- Carbonless Forms
- Catalogs
- Coasters
- Coupons
- Door Hangers
- Envelopes
- Flyers
- Greeting Cards
- Holograms
- Invitation Cards
- Labels
- Leaflets
- Letterheads
- Logo Designing
- Magazines
- Mouse Pads
- Newsletters
- NotePads
- Pamphlets
- Postcards
- Posters
- Presentation Folders
- Rack Cards
- Restaurant Menus
- Rip Cards
- Scratch-Off Cards
- Stickers
- Table Tents
- Tags
- Tickets
- Tote Bags
- Vinyl Banners


We offer free Graphic designing services with every order placed.
Just let us know your nature of your business, type of promotion or event you have planed and your chosen product for your advertisement, along with bit of text and graphics if you have any. Our team of professional graphic designers will design a layout for you. A dedicated in house designer will be assigned to your job for maximum productivity and uniqueness.
We will then send you JPEG proof via email for any changes/ approval.
However if you prefer working with your inhouse/hired designer or designing it yourself, we still would be more than happy to work on it and print your design concept and finalized layout. And we still would make JPEG Proof of your design file and would send your back for your approval.
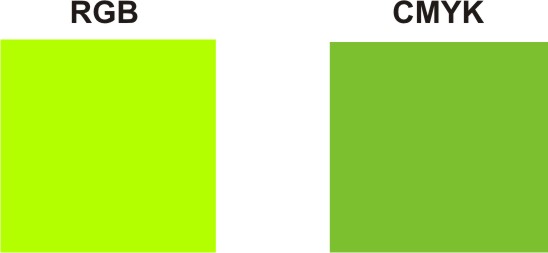
CMYK Color Mode:
The CMYK color model involves a 4 color process including Cyan, Magenta, Yellow and Black. Our products are printed using the CMYK color mode.
We prefer all artwork and images must be provided in CMYK color mode for all color side(s) and gray scale for the backside (if you choose 4/1).
Why We Require RGB-to-CMYK Conversion
You must convert all of the images from RGB to CMYK before sending them to us. When we receive images in RGB color scheme, before sending it for pre-press process, we convert your RGB images to CMYK. Please note that conversion to CMYK may cause colors to shift. During the CMYK conversion, we do our best to closely match the colors in your order. However, ezeeprinting.com in no way guarantees that the colors in your converted file will exactly match the colors of the images that you submitted to us in RGB format. We shall not be responsible for any imperfections due to your images being sent to us in RGB format, as we require RGB-to-CMYK conversion of images.
Resolution:
Any artwork you send must have a minimum of 300 DPI (dots per inch) resolutions.
Higher resolution means more image detail.
Raster graphics, such as TIF and JPG files must have a minimum resolution of 300 DPI (dots per inch). Images with less than 300 DPI after printing would appear fuzzy and pixilated.
When we receive low resolution images, it is our policy to try and convert all low resolution images of 200 DPI or greater to 300 DPI, without contacting you about the format of your submission. Ezeeprinting will not be responsible for any imperfections due to submission of a low resolution image, as we require all artwork to have a minimum of 300 DPI resolution.
You should not provide us any image picked / copied from an Internet website, because the Internet displays images at 72 DPI, which is low resolution and would result in loss of printing quality.

Outlined Fonts & Strokes:
When submitting EPS or PDF files to us, you must convert your fonts and strokes into outlines. If it is Coral Draw then just select the text and press contrl+Q, It will curve / outline the fonts into line work, and this way we no longer would need your fonts for printing. Outlining eliminates the need to send fonts along your files, while maintaining a nice, crisp typeface.
Alternatively, make high res .tif of the layer of all the text with uncommon fonts.
Be sure to save your original file (with Live Fonts) separate and apart from the version you outlined/ curved for printing, because if you save over your original document with the outlined version you will no longer be able to edit the text.
Transparencies:
We accept files with transparencies for printing. We recommend that you flatten all submitted transparencies in order to avoid any possible problems.
Transparencies are caused by shadows, glows and transparent objects created in a vector based platform such as Illustrator and InDesign. If a file containing transparency problems is printed the result will be a white box under the transparent object.

Flatten transparency for individual objects in Ai CS3
The Flatten Transparency command lets you see what your artwork will look like when flattened. For instance, you might use this command before saving the file in SWF (Flash) format or if you are having problems printing legacy art where transparency may be the culprit.
Rich Black:
FOR SOLID BLACK BACKGROUND: When you want an area of solid black within your document, use Rich Black, as represented by C:50% / M:50% / Y:10% / K:100%, because using 100% black (K) only and not a solid saturated black will result in a dull black.

How can I make sure my blues do not come out purple?
Blue is close to purple in the CMYK spectrum. Remember, use a low amount of magenta whenever using high amounts of cyan to avoid purple.
Example: C:100 M:70 Y:0 K:0
Bleeds, Safety Zones and Borders:
All bleeds should be atleast 1/8 of an inch (0.125) all around. If your submitted files are missing a bleed, it is our policy to try and .TIF your files, in order to correct the problem, without contacting you about the format of your submission and advance your job to print. We will not be responsible for any imperfections due to your submitted files missing a bleed, as we require print ready files.
Due to slight shifting that may occur during cutting, it is not recommended that you add a border, as we do not guarantee that your border will remain the same size after cutting. Particularly, when you add a border to a UV coated job, there may be slight slipping that may cause some shifting during cutting.
In order to prevent your image (text or picture) from being trimmed or cut off, the image must be 1/4 of an inch (0.25) from the edge of your layout.
Any images that are meant to extend into the edge of your design must extend into the bleed area, within a minimum of 1/16 of an inch all around (0.0625").
Bleed is a technical term for printing that extends to the edge of a page. For example, a business card is 3.5”x2", but we require a 1/16 (0.125”) bleed. Making the file 3.625”x”2.125
NOTE: Shifting of the blades may occur during the cutting process, which is why it is crucial that submitted files have bleed. If submitted file/s don’t have bleed, final printed piece will have white trimming around the edges.
For further options and questions, kindly send us emial and we would get back to you promptly.


Get FREE Graphic
Designing along with
Printing Order


